零、准备好自己的服务器
如没有自己的服务器,可以购买阿里云的这个,99一年3M带宽不限流量,不限流量这点我真的是大爱啊!
我看好多ngrok都是10元一个月,而且就给一个端口,自己搭建可以用无数端口关键还可以自己玩个服务器!美滋滋!
https://www.aliyun.com/benefit/developer/company?userCode=f2tqm2vw
一、服务器安装钉钉ngrok
https://github.com/fatedier/frp/releases
执行以下命令,下载frp工具压缩包。
wget https://github.com/fatedier/frp/releases/download/v0.52.3/frp_0.52.3_linux_amd64.tar.gz
执行以下命令,解压frp工具包。
tar -xvf frp_0.52.3_linux_amd64.tar.gz
执行以下命令,移动至/usr/local。
mkdir /usr/local/frp

mv frp_0.52.3_linux_amd64/* /usr/local/frp/
服务器中我的.toml配置文件内容(已经删除好了没用的东西)

[common] #必须设置
bind_port = 7000
vhost_http_port = 8081
因为我的服务器80端口被nginx占用了,所以我设置的vhost_http_port是8081端口,如下,如果大家不希望域名后面带端口号vhost_http_port就设置成80
http://test8081.yuming.top:8081
http://test8082.yuming.top:8081
http://test8083.yuming.top:8081
后台启动
cd /usr/local/frp/
nohup ./frps -c ./frps.toml > nohup.out 2>&1 &
二、客户端(自己电脑)启动
1、下载https://github.com/fatedier/frp/releases同样的包并解压缩
2、删除多余的服务端配置(不删也行)和修改配置文件

我的配置文件
server_addr是服务器公网ip,[test8081]中的名字是自己随便起的,唯一就行
这样配置下来test8082.yuming.top:8081就对应了本地的localhost:8082啦以此类推,我配置了这些就满足日常使用了。
[common]
server_addr = x.x.x.x
server_port = 7000

[test8081]
type = http
local_ip = 127.0.0.1
local_port = 8081
custom_domains = test8081.yuming.top
remote_port = 8081

[test8082]
type = http
local_ip = 127.0.0.1
local_port = 8082
custom_domains = test8082.yuming.top
remote_port = 8081

[test8083]
type = http
local_ip = 127.0.0.1
local_port = 8083
custom_domains = test8083.yuming.top
remote_port = 8081

[test8084]
type = http
local_ip = 127.0.0.1
local_port = 8084
custom_domains = test8084.yuming.top
remote_port = 8081

[test8085]
type = http
local_ip = 127.0.0.1
local_port = 8085
custom_domains = test8085.yuming.top
remote_port = 8081

[test8086]
type = http
local_ip = 127.0.0.1
local_port = 8086
custom_domains = test8086.yuming.top
remote_port = 8081

[test8087]
type = http
local_ip = 127.0.0.1
local_port = 8087
custom_domains = test8087.evilmass.top
remote_port = 8081

[test8088]
type = http
local_ip = 127.0.0.1
local_port = 8088
custom_domains = test8088.yuming.top
remote_port = 8081

[test8089]
type = http
local_ip = 127.0.0.1
local_port = 8089
custom_domains = test8089.yuming.top
remote_port = 8081

# 配置ssh服务
[ssh]
type = tcp
local_ip = 127.0.0.1
local_port = 22
 # 这个自定义,之后再ssh连接的时候要用
remote_port = 6022

[mysql]
use_encryption = true
type = tcp
local_ip = 127.0.0.1
local_port = 3306
remote_port = 6006
3、启动
cd /Users/mudaren/Downloads/frp_0.52.3_darwin_arm64

./frpc -c ./frpc.toml
三、(可选)服务端设置成systemctl启动或者停止运行
要将frps添加到systemd中,并以后台模式启动,可以创建一个.service文件来定义frps的系统服务。以下是一个示例.service文件的示例,可以根据需要进行调整:
- 创建一个名为
frps.service的文件(可以在/etc/systemd/system/目录下创建):
sudo nano /etc/systemd/system/frps.service
- 将以下内容粘贴到
frps.service文件中:
[Unit]
Description=frp server
After=network.target

[Service]
Type=simple
ExecStart=/usr/local/frp/frps -c /usr/local/frp/frps.toml
Restart=always
User=root

[Install]
WantedBy=multi-user.target
-
保存文件并退出编辑器。
Nano 编辑器保存文件并退的方法: 保存并退出: 按下 Ctrl + o(显示为 ^o WriteOut)来保存文件。 确认文件名并按下 Enter 键。 然后按 Ctrl + X(显示为 ^X Exit)来退出 Nano 编辑器。 -
启用并启动frps服务:
sudo systemctl daemon-reload
sudo systemctl enable frps
sudo systemctl start frps
现在,frps将作为一个后台服务在系统启动时自动启动。使用以下命令来检查其状态:
sudo systemctl status frps
如果需要停止服务,可以使用以下命令:
sudo systemctl stop frps
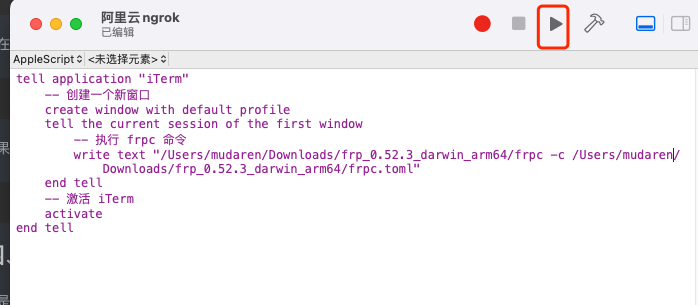
四、(可选)mac电脑还设置脚本编辑器一键启动
我是使用了iTerm2终端,并且使用了苹果电脑自带的脚本编辑器

保存脚本
tell application "iTerm"
	-- 创建一个新窗口
	create window with default profile
	tell the current session of the first window
		-- 执行 frpc 命令
		write text "/Users/mudaren/Downloads/frp_0.52.3_darwin_arm64/frpc -c /Users/mudaren/Downloads/frp_0.52.3_darwin_arm64/frpc.toml"
	end tell
	-- 激活 iTerm
	activate
end tell
以后每次直接按这个按钮就可以一键启动啦,非常的方便

五、钉钉ngrok的一些官方文档
因为我目前只开发测试时用,这点配置足矣了,如果大家有别的需求可以具体看官方的文档修改配置
六、其他我用过的免费的产品
1、花生壳,免费额度个人感觉有点小呀!
2、sunnyngrok,https://www.ngrok.cc/_book/
今年之前阿里云的那个99服务器好像一直不是无限流量的,在那之前我用的都是这家的,好几年了一直免费,好像是前两年有人做不好的事,作者被喝茶了,然后作者就设置了实名认证,需要交1块钱实名一下好像。这个挺好!我比较推荐!
